Execute the following command to insert the setting-record for the impulses per KW which is stated on your energymeter.
Please change the value 800 to the value which is specified on your energymeter
Code:
INSERT INTO `tblEnergyMeterSettings` (settingID, settingName, settingValue) VALUES (1, 'ImpulsesPerKiloWatt', 800);
Execute the following command to insert the record for the program. In this table all actual values of the hardware counter on the velleman board are stored, just like the values of the energymeter in your house. You have to fill in the current values of your meter in this command replace 12345.00000 with the current value of Tarif1 and 67890.00000 with the current value of Tarif2. The value 0.00000 is currently not used, it is for future use, the Gasmeter.
Code:
INSERT INTO `tblHardwareCounter` (counter1_Velleman, counter2_Velleman, EM_Tarif_1, EM_Tarif_2, GasCounter, UpdateTimestamp) VALUES (0, 0, 12345.00000, 67890.00000, 0.00000, '2009-07-10 14:15:10');
Execute the following command to insert the record for the tarifs. In this table the tarif are stored. You can actually add more tarifs and fill in a date to which they are valid. normally the active tarif doesn't have a date because you don't know until when it's valid. These are mine actual tarifs, check your electricity provider for actual tarifs, and don't forget to include all taxes because we want to see the total costs. You will feel that a kW/h is more expensive that you first actually thought of, but energy is expensive.
Code:
INSERT INTO `tblEnergyTarifs` VALUES (0.2065, 0.2638, 0.6991, NULL);
That's it for the MySql part.
Now the scheduling.
First, set up cron to run a script every minute.
Check if cron is already configured to run a script every minute by checking if the following folder on your asus exist:
If the folder exists, you should also check if your cron is setup to run the scripts in that folder every minute. Open crontab and the following line must exist in the file in
Code:
vi /opt/etc/crontab
for the folling line:
Code:
*/1 * * * * admin run-parts /opt/etc/cron.1min
If one or the other does not exist add the line above to the crontab file and create the folder with the command below:
Code:
mkdir /opt/etc/cron.1min
Now the logic.
The logic actually consists off 3 parts, 1 library which I've compiled myself so I think it should work on the asus wl500 line of routers with oleg's firmware installed. and 2 scripts for interfacing with the board and calculating values.
The library is placed in a new folder, the scripts (logic) are placed in /opt/sbin/.
First, create the new folder, go to the folder, download the library, remove extension (file download) and make it executable:
Code:
mkdir /opt/velleman/src
cd /opt/velleman/src
wget http://files.wl500g.info/asus/custom/raas/EM/k8055.RemExt
mv k8055.RemExt k8055
chmod +x k8055
Now, the script which runs every minute and collects data.
Code:
cd /opt/etc/cron.1min
wget http://files.wl500g.info/asus/custom/raas/EM/velleman.1min.sh
chmod +x velleman.1min.sh
This script runs every 5 minutes and fills the 'DailyTotals' table. I know all info could be extracted from the EnergyMeter tabel, but it has a lot of records. This table keeps a record for each day for its totals
Code:
cd /opt/etc/cron.5min
wget http://files.wl500g.info/asus/custom/raas/EM/velleman.5min.sh
chmod +x velleman.5min.sh
Now, for the output:
You can, of course, query the mysql database for whatever question you have regarding the stored data. But to get you on the road, I've include 3 graphs which are made with libchart. Download them here: http://files.wl500g.info/asus/custom...M/libchart.rar
Extract the file to a directory on your webserver and go to the 'demo' folder.
There you'll find 3 files:
- cost_electricitydaily-8.php which gives you a bar diagram of the cost of electricity per day over the last 8 days.
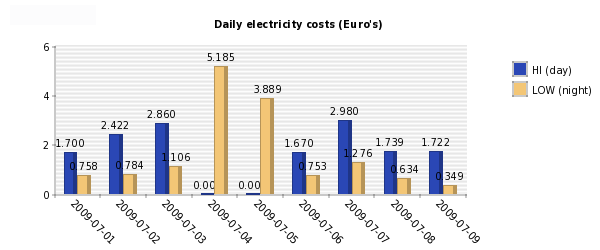
- electricitydaily-8.php which gives you a bar diagram of the use of electricity per day over the last 8 days in KiloWatts.

- electricityminute-30.php which gives you a line diagram of the use of electricity for the last 30 minutes. This is very usefull if you want to directly measure devices by turning them on and off for at least 2-3 minutes (to get a full reading for a couple of minutes).

Achievements so far:
For starters... I got it all to work :-)
For real: I managed to cut down the 'hidden' electricity consuption of my house by looking at the data this 'thing' provides: While having almost everything in the house turned of (except fridge, cooler and some other devices you have 'always-on' like modem/router/switch) I found out that the house was still using about 300watts per hour, which I though was too much. By unplugging some devices for a couple of minutes an do some measurements, I found out that a ventilation-fan I have in the attic to vent particular areas in the house was using up to 80watts/hour while it clearly stated that its maximum use would be 48 watts, but the fan was over 15 years old. So I replaced it with a new fan, which only uses 15 watts/hour. This fan runs 24/7, now you could do the math in what this saves in energy. practically the equipment used in this tutorial is paying for itself.
Also nice to know (well actually not, I know that the electricity companies are stealing from us!) that, since I have double tarif, high for office hours, low for evenings/nights/weekends they 'flip' the tarif 3 minutes later that they're supposed to do, multiply this by millions of households and they make an awfull lot of money by this tactic.
Plans for the future:
- measurement of gas (for heating and hot water) consumption, if you look close to your gas-meter, you will see that one of smallest digits have a reflective part (the 0 or the 6). with an opto-coupler you can detect if the meter 'has gone round' and add that unit of gas to the consumption
- let it be a director for the heating of the house. Because it has outputs, you can also 'drive' other equipment to switch on/off: If every room has its own temperature sensor and a heating plan, and the heating-radiator has an electronic valve.. however, you get the idea. I've found plans on the internet from people who use a pc to do this and they save 70% on their heating (mainly because rooms which aren't needed to be heated aren't heated according to the heating plan)
- add sensors to detect wheter or not doors and windows are opened.
The K8055 has only 5 inputs and 8 outputs (digital) and 2 analogue inputs and outputs. This wouldn't be enough for the scenario's above. However, if
you search on the internet you can find circuits which can be connected to the K8055 allowing you to switch up to 256 outputs. Or you would drop the
outputs to 64 and use up to 20 digital inputs and 8 analogue inputs... (in this case you use the output of the board to switch a ciruit so that other inputs/sensors are connected to the physial inputs of the board, you will have to do more cycles to collect and send all data, but it works.)
Disclaimer:
The information in this thread is only for educational purposes. I will not be held responsible for any damage you do to your equipment by using this tutorial. Although changes are very small that something like that will occur, I wanted it to be on the safe side. The way I describe this in this tutorial is how I got it to work.
I'm not an *nix programmer, but a ms.net programmer, so I don't know all commands in scripting in this language (like a integer to bit, or compare 2 dates to get the difference in seconds), so some functions or steps in the scripts may look rather dull to someone who is an actual *nix programmer. Bottom line is that this solution worked out for me.
Conclusion:
If you have any questions about this tutorial don't hesitate to ask. Also, if you have other additions which could be driven with the K8055 board, please post them. I started this as a project for 'home-automation' but when I began to think of this I concluded that 'before I can drive something, I have to measure it' resulting in this first project I did with the K8055.
Sources:
http://www.elektor.nl/artikelen-als-...r.227842.lynkx
http://www.velleman.be/ot/en/product/view/?id=351346
http://www.wl500g.info/showthread.php?t=10307
http://www.wl500g.info/showthread.php?t=5909
Enjoy!


 Reply With Quote
