Results 1 to 12 of 12

Thread: (How To) Measure Energy Consumption of your House

  1. #1

    Lightbulb (How To) Measure Energy Consumption of your House

    Hi All,

    (although I don't think this tutorial will be as much used as the HeadStart tutorials I've made, I think this tutorial is worth the hassle and I hope people enjoy reading and constructing this.)

    Introduction:
    In a world where energy prices are rising, computer manufacturers are taking the 'green' path and many governments have plans to reduce energy-consumption, co2 emissions and polution, people (including me) are becoming aware of the fact (mostly cost-driven) that if they reduce their energy-consumption they slow down the polution-rate and might save some extra bucks they can spend on other things.

    Now, enough of the 'preaching', the story above has put me to develop a energy-meter for my own house, so that I could see what my consumption and know what the costs are. Now this all isn't new, there are commercially available items for this, but now you can do it with your asus. I also know, you could go out and by a commercial power meter, but they are mostly the ones you have to put between the devices you want to measure. The method described here will allow you to measure all consumption of your house it's components. Besides that, if you're like me: Where's the fun in buying ready-made stuff if you can do it yourself. I have created this meter about half year ago, It has been running since. Right now, the database houses 180.000+ records and is about 15mb in size. So about 35mb of data per year gives an exact and detailed overview of every minute's energy consumption.


    Prerequisites:
    • Asus WL500xx series router (with 2 usb ports available, one for interfacing with the velleman board, second for storage)
    • Have a running installation of MySQL database on the asus
    • Have a working installation of cron (task scheduler)
    • Have a working installation of a webserver with php enabled (I use lighttpd)
    • Velleman K8055 USB interface board (http://www.velleman.be/ot/en/product/view/?id=351346)
    • 2 LDR's (Light dependant resistors)
    • 2 1k resistors
    • 5v ac/dc adapter (power-brick, taken from a mobile phone or something else)
    • electricity-meter in your house with LED indication ('digital' ones, which let a LED give a pulse for energy consumption. There also might be a LED
    • (soldering iron, solder, flux, time, patience, yadda..yadda..yadda)


    Theory:
    You need an an electricity meter which somehow indicates that energy is being consumed, and, if you have a double tarif from your energy-supplier, an
    indication about what the current tarif is. My particular energy-meter in the house is equiped with 3 leds. 2 LED's are for an indication of the tarif, the third one is a 'pulse' indication which indicates enery is being consumed. Now, most electricity meters state clearly what the 'unit' for the pulse is. Like mine, it states that it indicates '800 pulses per KW'. With this knowledge I know, that everytime the pulse-led blinks 1.25 watts of energy is actually consumed. If I put this along a timeline, and I count the 'pulses in a minute' I know that watts/minute consumed. If you multiply this by 60 (minutes in a full hour) you get the energy consumed measured in KW/H (as this is the most common indication about energy-consumption). Now, you could go and sit in front of your energy meter all day and count the 'blinking leds' and know your consumption. Chances are that you're not going to waste your time on this, so lets put togheter some components which can actually measure (or detect) the consuption and log this into a database and use this data.
    In the story above I mentioned 'counting of the pulses' and 'putting things along a timeline'. This is where the Velleman K8055 board and Asus router gets into the picture. The K8055 board is equiped with digital and analogue inputs and outputs. Besides that on 2 of the digital inputs it has a 16 bit counter that we can use. Sweet. This is exactly what we need. If we can make a circuit wich can detect the pulses and send these to the K8055 board, we're in business. If we then let the Asus router read out the values from the K8055 every minute we have detailed information about 'how much pulses were counted in the last minute' and 'which tarif is active right now' we gather information which provides the data for rendering reports about the energy consumption, costs etc.etc.


    How it works:

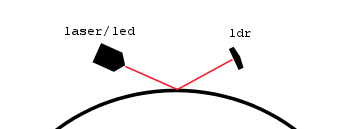
    • 5v of the ac/dc adapter goes to the circuit above which consists of the 2 LDR's and 2 resistors. It depends on the resistance of the LDR's if current is passed trough the Velleman K8055 board.
      The output of the circuit described above is connected to the K8055 its digital inputs.
    • Sensor E-meter is connected to input 1 of the velleman board (which has a counter)
    • Sensor E-meter tarif is connected to input 3 of the velleman board (which is the first which doesn't have a counter)
    The K8055 board only 'detects' if in input is 'hi' or 'lo'. Besides that, on the inputs on which a counter is active the Velleman itself counts the number of times the input has changed its state (it counts the pulses of the led).
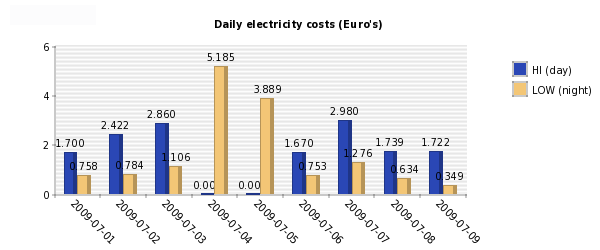
    While the K8055 board is also connected to the Asus wl500xx router its values can be read with a library installed on the Asus. Running a script every minute which uses the library and reads out the asus values and store these into a mysql database gives us information about the consumption. What you do with this data is all up to you. I've included 3 graphics which uses the data from the database to create a graph of the energy consumption.


    How to do it yourself:
    Hardware:

    • get a K8055 usb-interface board and make sure it works by using the test buttons on the board. (there is a test application on the supplied cd
    • build the circuit which is provided in this thread.
    • Connect the output of the pulse LDR to the input no:1 on the K8055 board and place the LDR in front of the pulse LED on your meter
    • Connect the output of the tarif LDR to the input no:3 on the K8055 board and place this LDR in front of the LOW tarif LED on your meter
    • Connect the ground of the sensor (0) to the ground of the velleman board

    (if you want, you can test again on your pc. to see that the couter is counting and the tarif is detected) Now that you're are familiar with the circuit and how it works, lets setup the asus router.


    Asus Router:
    first, let's create the database on the mysql server, open a session to the asus and execute the following command:
    (where obviously MYSQLPASSWORD is your mysql password)
    Code:
    mysql -uroot -pMYSQLPASSWORD

    An 'mysql' prompt will return.. please enter the following command to create the database:
    Code:
    CREATE DATABASE VellemanK8055;


    Now switch the console to use the newly created database:
    Code:
    use VellemanK8055

    Execute the following command to create the table: tblEnergyMeter
    Code:
    CREATE TABLE `tblEnergyMeter` (
    	  `dbrowid` int(11) NOT NULL auto_increment,
    	  `datetime` timestamp NULL default NULL,
    	  `MeterValue_1` decimal(8,4) default NULL,
    	  `MeterValue_2` decimal(8,4) default NULL,
    	  `CurrentMeter` char(1) default NULL,
    	  `WattsPerMinute` decimal(4,2) default NULL,
    	  `KiloWattsPerHour` decimal(5,4) default NULL,
    	  `CostperHour` decimal(4,3) default NULL,
    	  `MeasurementTimeInSeconds` int(8) NOT NULL default '0',
    	  PRIMARY KEY  (`dbrowid`),
    	  KEY `IX_TimeStamp` (`datetime`),
    	  KEY `IX_MV1` (`MeterValue_1`),
    	  KEY `IX_MV2` (`MeterValue_2`)
    	) ENGINE=MyISAM  DEFAULT CHARSET=latin1;


    Execute the following command to create the table: tblEnergyMeterDailyTotals
    Code:
    CREATE TABLE `tblEnergyMeterDailyTotals` (
    	  `dbrowid` int(11) NOT NULL auto_increment,
    	  `date` timestamp NOT NULL default CURRENT_TIMESTAMP on update CURRENT_TIMESTAMP,
    	  `Total_MeterValue_1` decimal(8,4) NOT NULL default '0.0000',
    	  `Total_MeterValue_2` decimal(8,4) NOT NULL default '0.0000',
    	  `Cost_Total_MeterValue_1` decimal(4,3) NOT NULL default '0.000',
    	  `Cost_Total_MeterValue_2` decimal(4,3) NOT NULL default '0.000',
    	  PRIMARY KEY  (`dbrowid`),
    	  KEY `IX_DATE` (`date`)
    	) ENGINE=MyISAM  DEFAULT CHARSET=latin1;


    Execute the following command to create the table: tblEnergyMeterSettings
    Code:
    CREATE TABLE `tblEnergyMeterSettings` (
    	  `settingID` int(11) NOT NULL auto_increment,
    	  `settingName` varchar(64) NOT NULL default '',
    	  `settingValue` varchar(32) NOT NULL default '',
    	  PRIMARY KEY  (`settingID`)
    	) ENGINE=MyISAM  DEFAULT CHARSET=latin1;

    Execute the following command to create the table: tblEnergyTarifs
    Code:
    CREATE TABLE `tblEnergyTarifs` (
    	  `TarifEMeter_1` decimal(5,4) NOT NULL default '0.0000',
    	  `TarifEMeter_2` decimal(5,4) NOT NULL default '0.0000',
    	  `TarifGas` decimal(5,4) NOT NULL default '0.0000',
    	  `ValidUntil` date default NULL
    	) ENGINE=MyISAM DEFAULT CHARSET=latin1;


    Execute the following command to create the table: tblHardwareCounter
    Code:
    CREATE TABLE `tblHardwareCounter` (
    	  `counter1_Velleman` int(11) default NULL,
    	  `counter2_Velleman` int(11) default NULL,
    	  `EM_Tarif_1` decimal(9,5) default NULL,
    	  `EM_Tarif_2` decimal(9,5) default NULL,
    	  `GasCounter` decimal(9,5) NOT NULL default '0.00000',
    	  `UpdateTimestamp` timestamp NULL default NULL
    	) ENGINE=MyISAM DEFAULT CHARSET=latin1;
    Read on in the next post to continue

  2. #2

    2nd part

    Execute the following command to insert the setting-record for the impulses per KW which is stated on your energymeter.
    Please change the value 800 to the value which is specified on your energymeter
    Code:
    INSERT INTO `tblEnergyMeterSettings` (settingID, settingName, settingValue) VALUES (1, 'ImpulsesPerKiloWatt', 800);

    Execute the following command to insert the record for the program. In this table all actual values of the hardware counter on the velleman board are stored, just like the values of the energymeter in your house. You have to fill in the current values of your meter in this command replace 12345.00000 with the current value of Tarif1 and 67890.00000 with the current value of Tarif2. The value 0.00000 is currently not used, it is for future use, the Gasmeter.
    Code:
    INSERT INTO `tblHardwareCounter` (counter1_Velleman, counter2_Velleman, EM_Tarif_1, EM_Tarif_2, GasCounter, UpdateTimestamp) VALUES (0, 0, 12345.00000, 67890.00000, 0.00000, '2009-07-10 14:15:10');
    Execute the following command to insert the record for the tarifs. In this table the tarif are stored. You can actually add more tarifs and fill in a date to which they are valid. normally the active tarif doesn't have a date because you don't know until when it's valid. These are mine actual tarifs, check your electricity provider for actual tarifs, and don't forget to include all taxes because we want to see the total costs. You will feel that a kW/h is more expensive that you first actually thought of, but energy is expensive.
    Code:
    INSERT INTO `tblEnergyTarifs` VALUES (0.2065, 0.2638, 0.6991, NULL);
    That's it for the MySql part.

    Now the scheduling.

    First, set up cron to run a script every minute.
    Check if cron is already configured to run a script every minute by checking if the following folder on your asus exist:
    Code:
    /opt/etc/cron.1min
    If the folder exists, you should also check if your cron is setup to run the scripts in that folder every minute. Open crontab and the following line must exist in the file in
    Code:
    vi /opt/etc/crontab
    for the folling line:
    Code:
    */1 * * * * admin run-parts /opt/etc/cron.1min
    If one or the other does not exist add the line above to the crontab file and create the folder with the command below:
    Code:
    mkdir /opt/etc/cron.1min

    Now the logic.

    The logic actually consists off 3 parts, 1 library which I've compiled myself so I think it should work on the asus wl500 line of routers with oleg's firmware installed. and 2 scripts for interfacing with the board and calculating values.
    The library is placed in a new folder, the scripts (logic) are placed in /opt/sbin/.
    First, create the new folder, go to the folder, download the library, remove extension (file download) and make it executable:
    Code:
    mkdir /opt/velleman/src
    cd /opt/velleman/src
    wget http://files.wl500g.info/asus/custom/raas/EM/k8055.RemExt
    mv k8055.RemExt k8055
    chmod +x k8055


    Now, the script which runs every minute and collects data.
    Code:
    cd /opt/etc/cron.1min
    wget http://files.wl500g.info/asus/custom/raas/EM/velleman.1min.sh
    chmod +x velleman.1min.sh
    This script runs every 5 minutes and fills the 'DailyTotals' table. I know all info could be extracted from the EnergyMeter tabel, but it has a lot of records. This table keeps a record for each day for its totals
    Code:
    cd /opt/etc/cron.5min
    wget http://files.wl500g.info/asus/custom/raas/EM/velleman.5min.sh
    chmod +x velleman.5min.sh


    Now, for the output:
    You can, of course, query the mysql database for whatever question you have regarding the stored data. But to get you on the road, I've include 3 graphs which are made with libchart. Download them here: http://files.wl500g.info/asus/custom...M/libchart.rar
    Extract the file to a directory on your webserver and go to the 'demo' folder.
    There you'll find 3 files:
    • cost_electricitydaily-8.php which gives you a bar diagram of the cost of electricity per day over the last 8 days.
    • electricitydaily-8.php which gives you a bar diagram of the use of electricity per day over the last 8 days in KiloWatts.
    • electricityminute-30.php which gives you a line diagram of the use of electricity for the last 30 minutes. This is very usefull if you want to directly measure devices by turning them on and off for at least 2-3 minutes (to get a full reading for a couple of minutes).


    Achievements so far:
    For starters... I got it all to work :-)
    For real: I managed to cut down the 'hidden' electricity consuption of my house by looking at the data this 'thing' provides: While having almost everything in the house turned of (except fridge, cooler and some other devices you have 'always-on' like modem/router/switch) I found out that the house was still using about 300watts per hour, which I though was too much. By unplugging some devices for a couple of minutes an do some measurements, I found out that a ventilation-fan I have in the attic to vent particular areas in the house was using up to 80watts/hour while it clearly stated that its maximum use would be 48 watts, but the fan was over 15 years old. So I replaced it with a new fan, which only uses 15 watts/hour. This fan runs 24/7, now you could do the math in what this saves in energy. practically the equipment used in this tutorial is paying for itself.

    Also nice to know (well actually not, I know that the electricity companies are stealing from us!) that, since I have double tarif, high for office hours, low for evenings/nights/weekends they 'flip' the tarif 3 minutes later that they're supposed to do, multiply this by millions of households and they make an awfull lot of money by this tactic.

    Plans for the future:
    - measurement of gas (for heating and hot water) consumption, if you look close to your gas-meter, you will see that one of smallest digits have a reflective part (the 0 or the 6). with an opto-coupler you can detect if the meter 'has gone round' and add that unit of gas to the consumption
    - let it be a director for the heating of the house. Because it has outputs, you can also 'drive' other equipment to switch on/off: If every room has its own temperature sensor and a heating plan, and the heating-radiator has an electronic valve.. however, you get the idea. I've found plans on the internet from people who use a pc to do this and they save 70% on their heating (mainly because rooms which aren't needed to be heated aren't heated according to the heating plan)
    - add sensors to detect wheter or not doors and windows are opened.
    The K8055 has only 5 inputs and 8 outputs (digital) and 2 analogue inputs and outputs. This wouldn't be enough for the scenario's above. However, if
    you search on the internet you can find circuits which can be connected to the K8055 allowing you to switch up to 256 outputs. Or you would drop the
    outputs to 64 and use up to 20 digital inputs and 8 analogue inputs... (in this case you use the output of the board to switch a ciruit so that other inputs/sensors are connected to the physial inputs of the board, you will have to do more cycles to collect and send all data, but it works.)

    Disclaimer:
    The information in this thread is only for educational purposes. I will not be held responsible for any damage you do to your equipment by using this tutorial. Although changes are very small that something like that will occur, I wanted it to be on the safe side. The way I describe this in this tutorial is how I got it to work.
    I'm not an *nix programmer, but a ms.net programmer, so I don't know all commands in scripting in this language (like a integer to bit, or compare 2 dates to get the difference in seconds), so some functions or steps in the scripts may look rather dull to someone who is an actual *nix programmer. Bottom line is that this solution worked out for me.

    Conclusion:
    If you have any questions about this tutorial don't hesitate to ask. Also, if you have other additions which could be driven with the K8055 board, please post them. I started this as a project for 'home-automation' but when I began to think of this I concluded that 'before I can drive something, I have to measure it' resulting in this first project I did with the K8055.


    Sources:
    http://www.elektor.nl/artikelen-als-...r.227842.lynkx
    http://www.velleman.be/ot/en/product/view/?id=351346
    http://www.wl500g.info/showthread.php?t=10307
    http://www.wl500g.info/showthread.php?t=5909


    Enjoy!
    Last edited by raas; 14-07-2009 at 07:41. Reason: finishing tutorial

  3. #3
    Join Date
    Dec 2007
    Location
    The Netherlands - Eindhoven
    Posts
    1,767
    Nice one raas
    I still got an old meter here tho, it just has a mechanical meter
    this is probably the solution if you want to measure your usage without a digital meter with web-interface.

    btw, you say it runs every 5 minutes, why is it in the 1 min directory then?

  4. #4
    Quote Originally Posted by wpte View Post
    Nice one raas
    btw, you say it runs every 5 minutes, why is it in the 1 min directory then?
    1minute scripts collects data from the velleman board and stores this in a table 24*60=1440 records a day.

    the 5 minute script calculates the cumulative values for a day, which means a totalized 1 record a day..

    This is faster for the graphs to create..
    Thats why

    I normally don't like to store values which can be computed, but due to the 'huge' amount of data on such a 'small' machine I decided to store the cumulative values.

  5. #5
    Quote Originally Posted by wpte View Post
    Nice one raas
    I still got an old meter here tho, it just has a mechanical meter
    Hi,

    I think, somehow you can also measure these kinds of meters.
    If it is the one with the 'spinning wheel', it also should specify what it's rotation time is. the spinning wheel is either all black with a shinny part, or all shinny with a black part. you could somehow 'sense' this with something below.. (obviously I don't do artistic work for a living )


    Greetz,

  6. #6
    Hi Raas,

    Can you tell me Which type of LDR you are using with the 1k resistor ?

    (i.e. What resistance in Light and what resistance in dark)

    Or do you happen to have a conrad part number??

  7. #7
    Join Date
    Dec 2007
    Location
    The Netherlands - Eindhoven
    Posts
    1,767
    Quote Originally Posted by raas View Post
    Hi,

    I think, somehow you can also measure these kinds of meters.
    If it is the one with the 'spinning wheel', it also should specify what it's rotation time is. the spinning wheel is either all black with a shinny part, or all shinny with a black part. you could somehow 'sense' this with something below.. (obviously I don't do artistic work for a living )


    Greetz,
    Yeah, looks good. I will need a very thin laser beam tho, since the black parts between the silver blocks are not really big. Otherwise I guess you won't see a drop in a graph with a big laser.

    Maybe I'll hook something like that up to my atmel usb key some time.

  8. #8
    Quote Originally Posted by DrChair View Post
    Hi Raas,

    Can you tell me Which type of LDR you are using with the 1k resistor ?

    (i.e. What resistance in Light and what resistance in dark)

    Or do you happen to have a conrad part number??
    Sure,

    Here are the partnumbers from conrad:

    2 x 1k resistor: 405256 - 89

    2 x LDR : 145483 - 89


    1 x Velleman interface board: 191003 - 89

    I don't know exactly for the resistance (or better, the difference.)
    I seems like that the voltages don't go exactly 5v and 0v , but the difference in voltage is high enough for the velleman board to tell the difference between hi/lo, even if there's only a 100 msec. blink of the led. the velleman senses it, and counts it.
    I believe the max resistance of the ldr is 1k.

    HTH.
    Last edited by raas; 14-07-2009 at 07:32.

  9. #9
    Quote Originally Posted by wpte View Post
    Yeah, looks good. I will need a very thin laser beam tho, since the black parts between the silver blocks are not really big. Otherwise I guess you won't see a drop in a graph with a big laser.

    Maybe I'll hook something like that up to my atmel usb key some time.
    Hi,

    I think it'll work, have a look at http://www.wattcher.nl this is a commercially available product which I believe has a version which works with your particular power meter.

    HTH

  10. #10
    a couple of corrections on your HowTo:

    - I miss the part where you put velK8055 in /opt/sbin.
    - you need bc (ipkg install bc)
    - you need libusb (ipkg install libusb)
    - you should use mkdir -p /opt/velleman/src instead (if /opt/velleman doesn't exists yet, your variant gives an error)

    And just wondering, the +5 V you put into the LDRs, do you take these from the Velleman board (thus from usb) or do you use a separate powersource?
    Last edited by DrChair; 26-07-2009 at 00:24.

  11. #11
    Join Date
    Nov 2003
    Location
    Eindhoven
    Posts
    2,407
    anyone got this working with the rotating meters ?

    I think 129 for a wattcher is too much.. as we also have to buy a rfxcom then if it's compatible at least..

    ZieNu also have something around 90 euro's, but not wireless

    My little Asus Collection: Too much to fit inhere, my 2 babies:WL500w 1.9.2.7-10(OLEG) VX2SE Yellow Lamborghini notebook


    WL500g Forum Asus Files OpenDir

    Asusforum.NL -- Asusforum.DE -- Asusforum.RU -- Asusforum.PL -- Asusforum.NET -- Asusforum.EU -- Asusforum.BE -- Asusforum.ES -- Asusforum.INFO

  12. #12
    Hello Antiloop,
    I don't have this kind of meter, so I can not try this, but I think with a handfull of LED's, LDR, resistors, and mabye even an optocoupler (CNY70) worth of total 10 euros you can start experimenting and get a working 'sensor'

Similar Threads

  1. Power Consumption
    By mugen in forum WL-500gP Q&A
    Replies: 6
    Last Post: 15-01-2008, 23:16
  2. How much is Power Consumption for WL-700gE ... ?
    By i.car in forum WL-700g Pics & Specs
    Replies: 7
    Last Post: 11-05-2007, 20:14
  3. wl500gp vs gx power consumption
    By fanoush in forum WL-500gP Q&A
    Replies: 0
    Last Post: 16-04-2007, 10:17
  4. WL-500gx Power Consumption
    By lukedaman2000 in forum WL-500g Q&A
    Replies: 4
    Last Post: 21-12-2005, 20:42

Tags for this Thread

Posting Permissions

  • You may not post new threads
  • You may not post replies
  • You may not post attachments
  • You may not edit your posts
  •