Page 1 of 4 123 ... LastLast
Results 1 to 15 of 114

Thread: [HowTo] Upgrading RAM to 128 MB (WL-500gP, WL-500W and WL-700gE)

Hybrid View

Previous Post Previous Post   Next Post Next Post
  1. #1
    Join Date
    Dec 2003
    Location
    Russian Federation
    Posts
    8,356

    Thumbs up [HowTo] Upgrading RAM to 128 MB (WL-500gP, WL-500W and WL-700gE)

    As most of you asked to publish this I've finally finished this guide...

    The goal of this mod is to increase built in memory up to 128MB to be able run more services on the router without the expense of accessing slow swap, etc. Beware, that this mod requiresvery strong soldering skills! And usual disclaimer: do it on your own risk to brick the router completely.

    What do you need to perform a mod?

    • Good soldering skills at first (the board is Pb Free!) and equipment
    • One 22Ohm (33 Ohm is also ok) resistor to enable A12 address line (not needed for WL-700gE, as it has it already)
    • Two TSOP packaged DDR333 or DDR400 SDRAM chips organized as 32Mx16

    The easiest way to get chips (and perhaps cheap) is to remove them from the PC2700/PC3200 DIMM or SO-DIMM: at the moment we've checked the following parts:
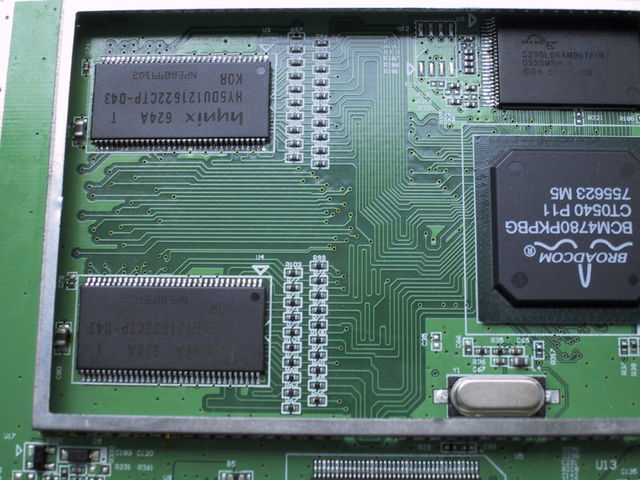
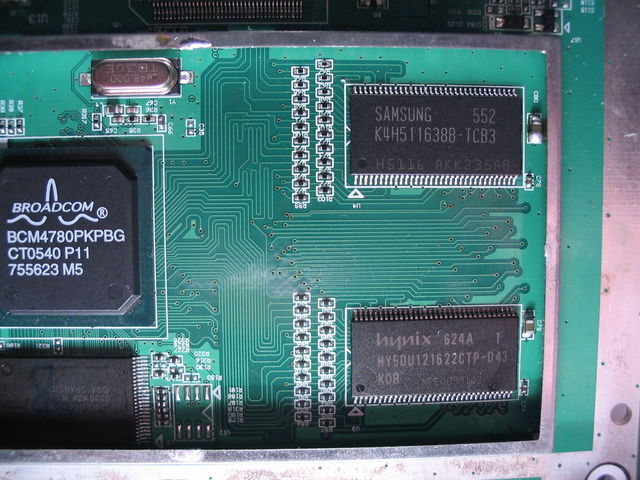
    • Hynix HYMD532646CP6J-D43 PC3200 DIMM: it has Hynix HY5DU121622CTP-D43 chips
    • Samsung M470L6524BT0-CB3 PC2700 SO-DIMM: it has Samsung K4H511638B-TCB3 chips
    • Samsung M470L6524DU0-CB3 PC2700 SO-DIMM: it has Samsung K4H511638D-UCB3 chips
    • Transcend TS32MSD64V3M PC2700 SO-DIMM: it has Elpida D5116AFTA-5B-E chips

    Please note, that Hynix is least preferred. Also, avoid using Infineon chips.
    The problem is that PCB is not ideally traced and has some noise UDQS line coming to U4, resulting in memory errors (see below).

    Doing it

    • Start with flashing latest firmware which is known to support 128MB of RAM. My firmware starting with 1.9.2.7-7g are known to work ok, as they've required patches. But I recomend flashing latest anyway.
    • Telnet/ssh to your router and type
      Code:
      nvram set sdram_init=0x000b
      nvram set sdram_config=0x0032
      nvram commit
      halt
      This would turn U4 chip off and prevent my firmware from auto enabling it. The router would be halted too, so you could safely remove power from it.
    • Disassemble your router now
    • Remove shieldings from the back of PCB (it's self-adhesive) and from the top
    • Solder 22 Ohm resistor on the free pads labeled R43. Skip this step if you have WL-700gE. Check image below:

    • Replace original U3 chip with your new memory chip. Be sure to remove PB free solder completely from the PCB pads before soldering your new chip!
    • Power your device on. It should now start normally and report 32MB of RAM (use free to check this).
      If it does not: check your soldering work again. Don't even think of pin-9 trick or whatever! FYI: all routers starts
      after replacing U3 chip.
    • Test RAM using memtest (see below). If it fails, then double check your soldering and try again.
    • Given, that your router works with U3 replaced, continue with replacing U4, now it should look like this:

    • Replaced? Ok, turn it once again and check, that it still work. If it does not check U4 soldering: perhaps you short-cuted something... Now type the following in the telnet/ssh to enable U4 and 128MB of RAM:
      Code:
      nvram set sdram_init=0x0011
      nvram set sdram_config=0x0062
      nvram commit
      reboot
    • It should now reboot. If it does, than you're lucky man (Elpida and Samsung chips are reported to be very lucky)
      if it does not (Hynix never boots this way) then proceed this way: check your U4 soldering work once again. Try
      to power on your device. If everything looks good then you've to try adding 3-7 pF capacitor between U4 pin 51
      (UDQS) and ground:

      .
    • If it does not boot - check your soldering work once again. If it still does not work - I've no idea then. Don't blame me, this is ASUS PCB fault.
    • Test RAM using memtest (see below). Leave it running for a long time to be absolutely sure it works fine. If it does not, then perhaps you should solder a capacitor as described above. Once it's error free, you could tell
      memory controller to re-tune some internal timings:
      Code:
      nvram set sdram_ncdl=0
      nvram commit
      reboot


    Activating 128MB with known good memory
    You need this everytime you perform a reset to defaults...
    Code:
    nvram set sdram_init=0x0011
    nvram set sdram_ncdl=0
    nvram commit
    reboot
    Testing device memory
    Type these lines to start testing:
    Code:
    cd /tmp
    wget http://oleg.wl500g.info/bin/memtest
    chmod +x memtest
    ./memtest 16m
    Note, that memtest at most could only pin half of device memory. Replace 16m with 64m for 128MB of RAM.

    Pictures
    WL-700gE with Samsung chips and 8MB flash

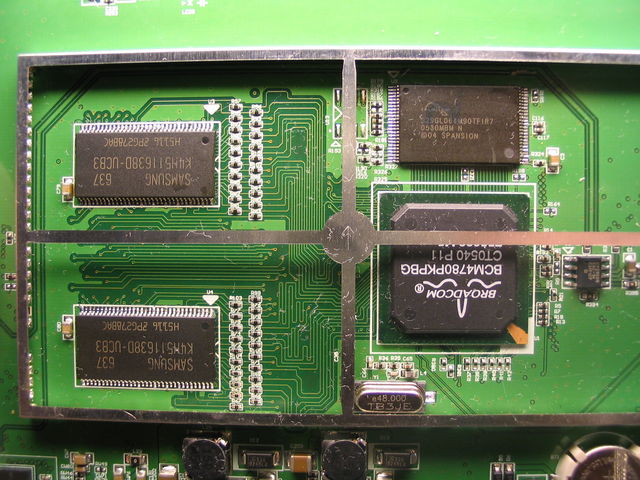
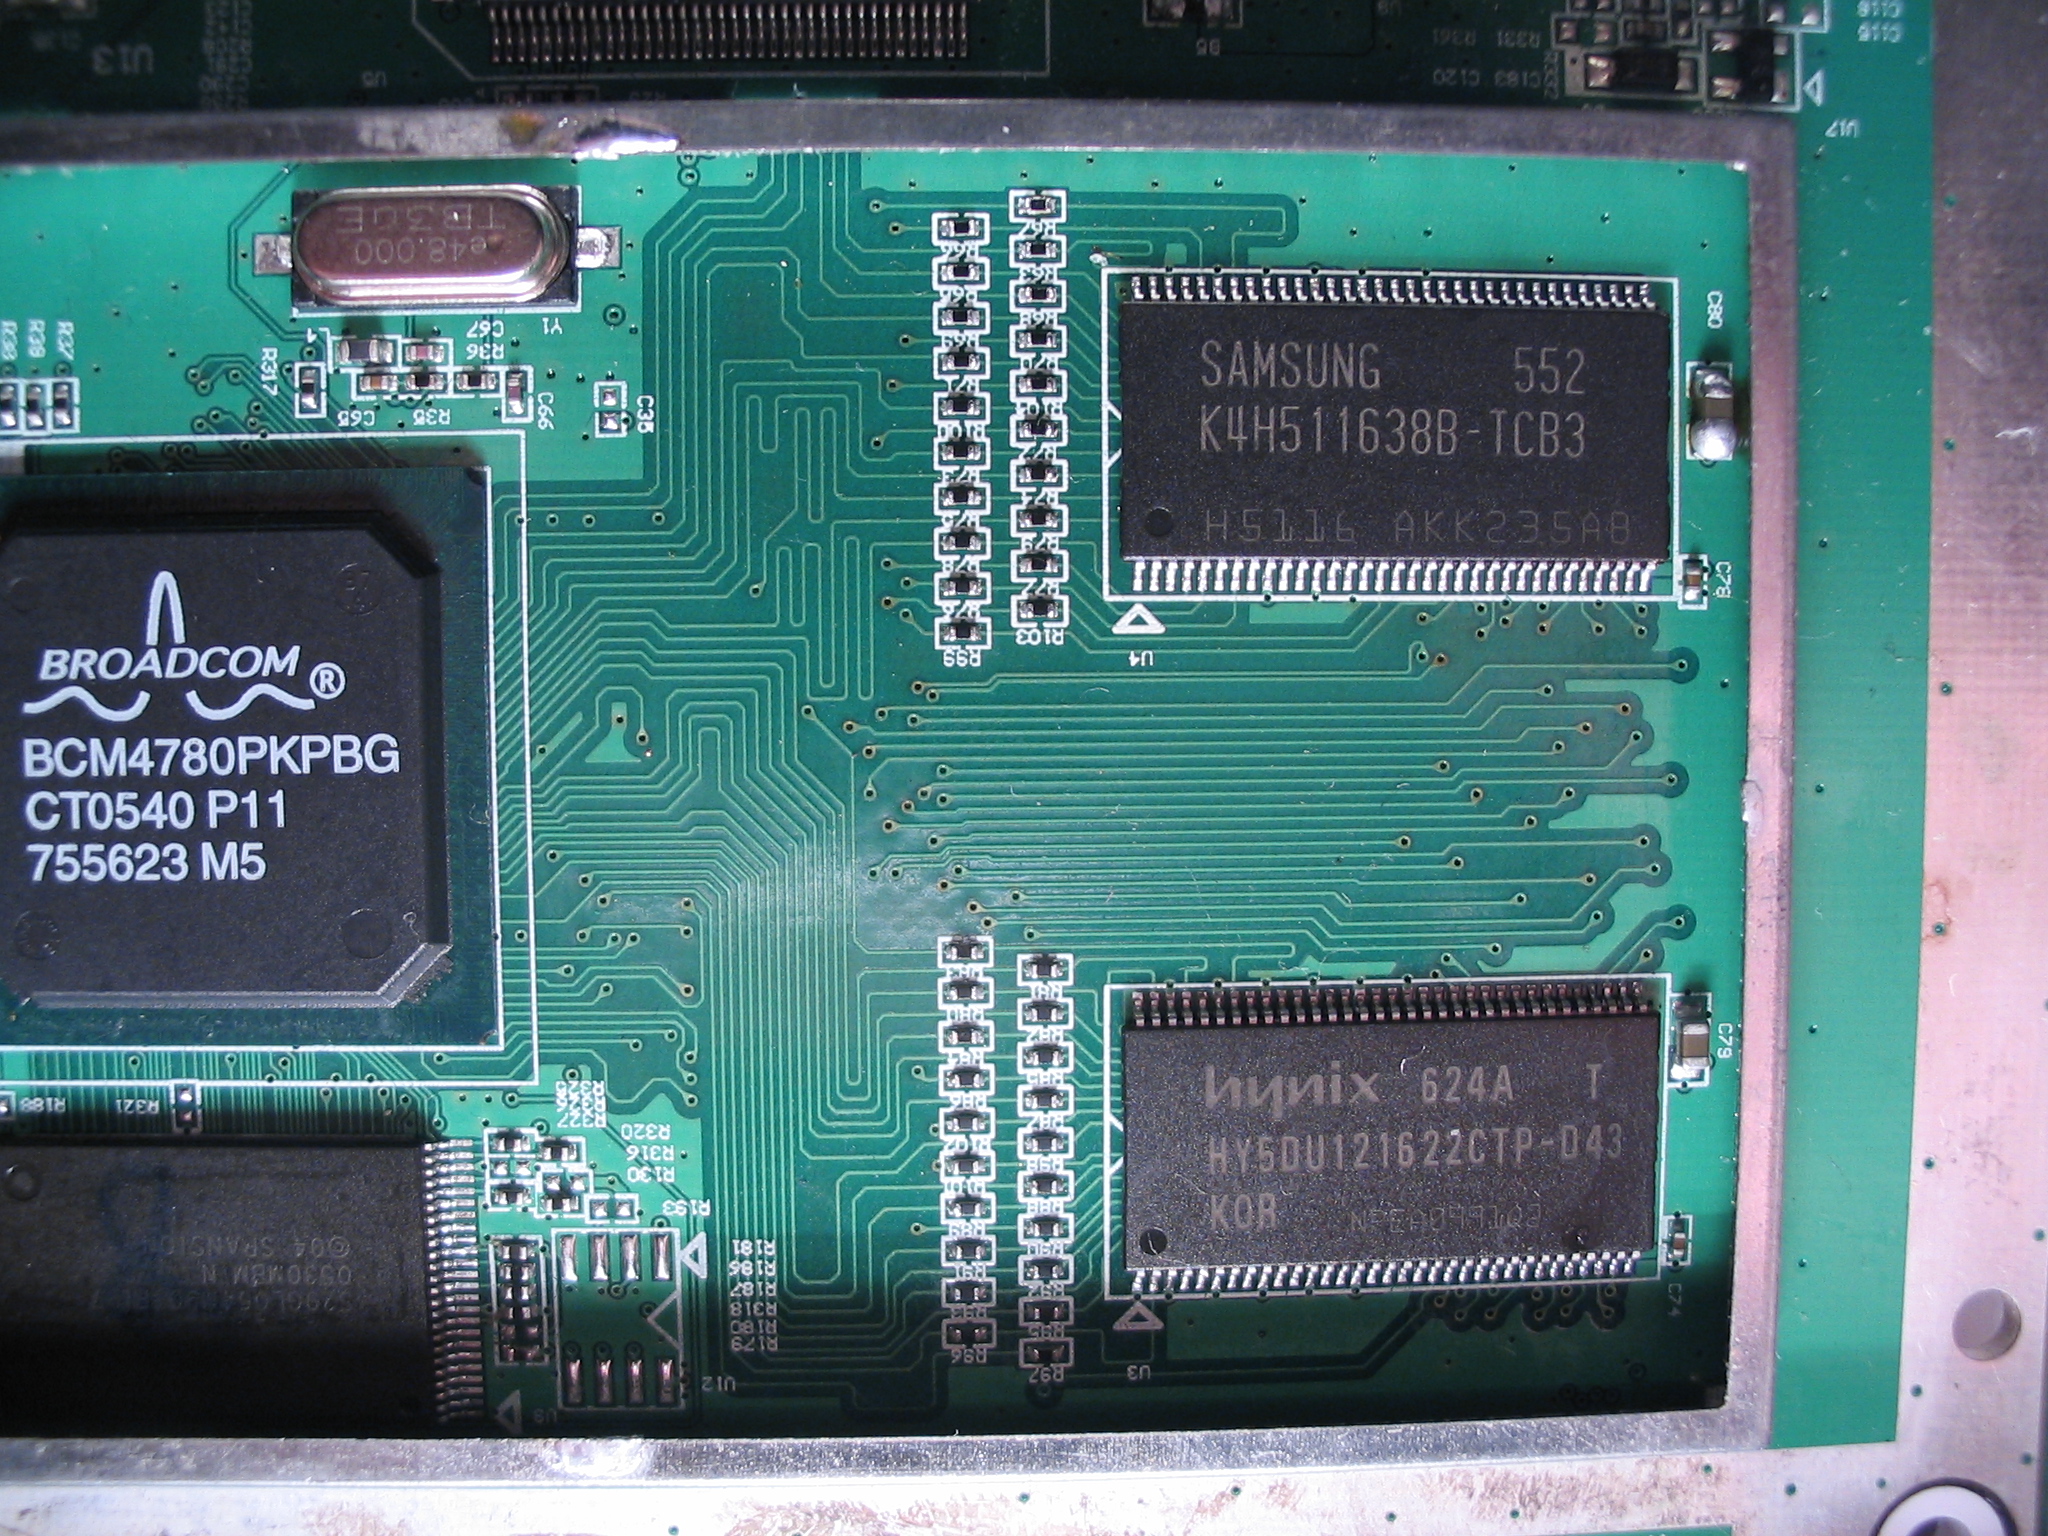
    WL-500gP with Samsung and Hynix chips at the same time
    Samsung chip does not need caps on this PCB...

    Last edited by Oleg; 10-02-2008 at 14:36. Reason: Typos

  2. #2
    Join Date
    Dec 2003
    Location
    Russian Federation
    Posts
    8,356
    Also, filed here: http://oleg.wl500g.info/wl500gp_ram.html

    Russian page with more pics: http://wl500g.info/showthread.php?t=7048
    Russian discussion with more pics: http://wl500g.info/showthread.php?t=7523

  3. #3
    Join Date
    Jul 2007
    Location
    Austria
    Posts
    1,336
    MANY THANKS!!

    Simple perfect and outstanding - as usual!

  4. #4
    Join Date
    Dec 2003
    Location
    Russian Federation
    Posts
    8,356
    Good luck in upgrading your unit. For the first unit it took for about a two weeks to complete the mod: the problem was a hynix (and we have not figured yet that cap at UDQS could solve a problem) and PB free PCB. But finally, all routers are working fine. Try to find Elpida or Samsung chips. I beleive Transcend should be available in european stores too.

  5. #5
    @Oleg
    Thanks for the tutorial.

    Do you think I could solder the new ram chips on top of the original chips?
    That would allow me to select between the old and the new chips by resoldering the CS Pin.

    Trucki

  6. #6
    Join Date
    Dec 2003
    Location
    Russian Federation
    Posts
    8,356
    Most likely no: DDR chips are very sensitive to tracing and pin capacitance. You know, they're running at 133 Mhz...

  7. #7

    only 64MB is visible

    Oleg,

    When disabled U4, changed U3 to MICRON MT46V32M16-6T and boot I can see 64MB (so it seams one chip is working). When changed U4 and enabled both (0x0011, 0x0062, 0x0000) I still see 64MB. Do you know where could be the problem (adding capacitor does not change anything).

    BTW: do you know when default settings are used (in CFE "printdefault"). There are 0x0009, 0x0062, 0x0000) (sdram_init, sdram_config, sdram_ncdl) - in rescue mode?

  8. #8
    Join Date
    Dec 2003
    Location
    Russian Federation
    Posts
    8,356
    have you used pin 9 trick at some point?

  9. #9
    no, I didn't use use pin 9 trick. My router was working properly and decided to expand ram. So I followed procedure you described but at the end I see only 64MB. Do you think I need another sdram_config?

    ----

    correction - I have used pin9 trick few months ago (before trying the ram expansion).
    Last edited by mitek; 15-03-2008 at 16:42.

  10. #10
    Join Date
    Dec 2003
    Location
    Russian Federation
    Posts
    8,356
    erase /dev/mtd/3
    erase /dev/mtd/4

    this would wipe pin9 effect and reset to defaults.

  11. #11

    Talking

    Thanks a lot.
    It helped and now I see whole 128MB.
    I'll run memtest for a night and see if everything is working fine.

  12. #12

    Talking One more happy wl500gP with 128M ram upgrade!

    Big thanks to Oleg and all the contributors!


    I’ve been looking around for a small form factor computer to use as the main computer of a mobile robot, when it occurred to me that routers are actually becoming some very good examples of physically small computers.

    Linux is my OS of choice for such projects, so I was very happy to learn about the wl500gP + Oleg's firmware combo.

    Spec's-wise the wl500gP it's nearly all-ready out of the box, but then again, one can never have enough memory!

    Then I landed on that 128M memory upgrade post by Oleg, and this is the story:

    Components:

    After a week long search some NANYA NT5DS32M16BS-5T were located. So why not give it a try? There was no confirmation for these back then, though according to the datasheet they were pin compatible and organised as 32x16. But when I was about to acquire them, I got a call from a second-hand store, about some SO-DIMM with Samsung K4H511638C-UCB3 gathering dust on their shelves, so that was it! These were confirmed by trucki and way cheaper too.
    (Thanks to particleman we now have a confirmation for NANYA NT5DS32M16BS-5T)

    33 Ohm smd 0402 resistors were kindly donated from an old dvd player, (one for A12 line, one more to replace an accidentally desoldered and lost one)


    Method:

    - Used a hot-air gun (the paint-stripping gender) to preheat the pcb and then desolder the (fluxed) memory chips, while protecting the rest of the pcb with multiple layers of aluminium foil as a heat screen, both from the SO-DIMM and the wl500gP.
    - Applied no-clean flux on the pads, then removed the solder from the pcb pads with desoldering braid (wick).
    - Cleaned around with some alcohol and some cotton buds.
    - Positioned the chip, then kept it in place with some scotch tape (it *really* helps).
    - Used a fine tip, low wattage soldering iron with tiny amounts of solder applied on the tip.
    - soldered pins under optical aid.
    - cleaned around some more.
    - Scanned and hi-res macro-photographed the result from various angles to visually inspect on screen.
    - checked for sort / open circuits with a multi-meter.
    - reworked a few stubborn pins.

    And voila! It didn't work no power led on disappointment

    At the time it was already very late at night, so I slept over it, many nights, and when I found the time, armed with multimeters, optical aids, pencil and paper for an improvised schematic, datasheets, previous pic's of the tracks under the chips and quite some patience I checked again every single track and pin on the first chip (U3). Pins 18 (Vdd) and 4 (DQ1) were found to be loose, giving false positives when pressed on their pads with the multi-meter probe. They were resoldered while I pressed down on them with a pointed tool and voila, router finally up and running! U4 was not much of an issue and soon I had all 128M of ram activated!

    At first strong vibration would freeze the router (more loose pins) but then the soldering iron came again in to play, and everything worked just fine!

    The router went through twelve runs of memtest and all is fine! Router is happy, I am happy, big Thanks Oleg!


    Here is a reference list compiled from this forum with all chips known to work so far for wl500gP:

    Code:
      Chip:              By:        On memory module:  Type:  Form:   By:       Confirmed by:  Note:   
    
      HY5DU121622CTP-D43 HYNIX     HYMD532646CP6J-D43 PC3200    DIMM HYNIX     Oleg             1
      K4H511638B-TCB3    SAMSUNG   M470L6524BT0-CB3   PC2700 SO-DIMM SAMSUNG   Oleg             .
      K4H511638D-UCB3    SAMSUNG   M470L6524DU0-CB3   PC2700 SO-DIMM SAMSUNG   Oleg             .
      D5116AFTA-5B-E     ELPIDA    TS32MSD64V3M       PC2700 SO-DIMM TRANSCEND Oleg             .
      K4H511638F-TCB3    SAMSUNG                                               newbiefan        .
      K4H511638D-UCB3    SAMSUNG                                               newbiefan        .
      K4H511638C-UCB3    SAMSUNG   KVR333X64SC25/512  PC2700 SO-DIMM KINGSTON  trucki           .
      MT46V32M16-6T      MICRON                                                mitek            1
      NT5DS32M16BS-5T    NANYA                                                 particleman      .
      K4H511638B-TCB3    SAMSUNG                                               oyabun           .
      K4H511638C-UCB3    SAMSUNG   M470L6524CUO-CB3   PC2700 SO-DIMM SAMSUNG   inertial         .
      HY5DU121622CTP-D43 HYNIX                                                 NotebookKiller   1
    Note 1: Capacitor between pin 51 and ground / Clock lines employed.
    Note 2: Infineon chips are reported as not collaborating with wl500gP pcb.

    Be warned that the pcb pads are really easy to damage, static electricity could fry the chips, thermal shock could destroy them as well as the pcb and other components, flux/solder fumes are usually toxic, etc.
    Before attempting such a mod it would be useful to search for "SMD desoldering" on the net, since there are many informative how-to's and even videos on the subject, get familiar with the "reflow thermal curve" and "ESD damage", practice desoldering and soldering on some scrap pcb's first and make sure you won't miss your router too much if things go wrong.

    Admittedly, coming from an H/W background I have quite extensive soldering/desoldering experience but I still believe it's possible to perform the mod when having some soldering experience and rehearsing the steps on some scrap first.

    @breizh76:
    I am pretty sure your asus is recoverable, have a look at what these people from http://www.circuitmedic.com are doing.
    Agreed it requires lots of tools and even more skill, but still it is possible!
    Got four partially lifted pads myself, when desoldering U3 but finally everything works fine.
    Had a 60G HD too with many cut and lifted tracks 'few years ago, but managed to functionally restore it (visual aesthetic aspect though... ouch!)
    If you don't feel confident, you could find some hardware-tech / mobile-phone repair-tech guy that could do it, or even I could try and have a go at it, if you post me your unit.

    @All:
    Could any one direct me to some wl500gP schematics, if such thing is available? I’d like to try some extensive wl500gP hard-hacking


    Inertial
    Last edited by Inertial; 06-04-2008 at 12:15.

  13. #13
    Quote Originally Posted by Inertial View Post
    @All:
    Could any one direct me to some wl500gP schematics, if such thing is available? I’d like to try some extensive wl500gP hard-hacking
    Inertial
    Unfortunately I haven't seen anything like that so far. I'd be interested too.
    What kind of hard hacking are you thinking about?

  14. #14
    Join Date
    Apr 2008
    Location
    Ëîáíÿ ÌÎ
    Posts
    59
    Hello. I made 128m upgrade with Hynix HY5DU121622CTP-D43 chips. I really don't understand, why do people solder capacitor to UDQS? On original modules it is between clocks - normal and inverted. In Asus there's no such a capacitor. I added it (marked red on photo) by scratching solder mask on clock lines and soldering to them. Device started normally and passed the all-night memtest torture without any errors. Capacitor was taken from the same module as chips.
    Attached Images Attached Images  

  15. #15
    If anyone have one to sell with 128mb working without problems, or if anyone wants to profit with mod i'll buy it for double the price.

Page 1 of 4 123 ... LastLast

Similar Threads

  1. Hardware Encryption on WL-500gP / WL-500gD / WL-700gE
    By staticroute in forum Russian Discussion - РУССКИЙ (RU)
    Replies: 10
    Last Post: 07-02-2013, 12:53
  2. [HowTo] Setup MediaTomb (mediaserver) on WL-500gP and WL-500W
    By rathalian in forum WL-500gP Tutorials
    Replies: 53
    Last Post: 20-12-2012, 21:14
  3. [HowTo] Get a HeadStart on a WL-500gP
    By raas in forum WL-500gP Tutorials
    Replies: 187
    Last Post: 11-01-2012, 08:19
  4. WL-500g Premium died After Upgrading Firmware
    By acidbrain in forum WL-500gP Firmware Discussion
    Replies: 166
    Last Post: 17-06-2011, 07:59
  5. HowTo: Use Palm as 500gP LCD
    By Tamadite in forum WL-500gP Tutorials
    Replies: 1
    Last Post: 08-02-2009, 21:18

Tags for this Thread

Posting Permissions

  • You may not post new threads
  • You may not post replies
  • You may not post attachments
  • You may not edit your posts
  •